®™Trademark of The Dow Chemical Company (“Dow”) or an affiliated company of Dow
I N S T A L L A T I O N I N F O R M A T I O N . C O M M E R C I A L
(CM Series) contractor foams a
similar portion of the wall on the
i
nterior side.
This system of products provides
scheduling overlaps that can save
significant time on a project,
minimizing negative impacts and
providing an opportunity for multiple
contractors to engage in finishing the
exterior wall throughout the project.
CONTINUOUS INSULATION/
DRAINAGE PLANE
INSTALLATION RECOMMENDATIONS
1. With printed side facing to the
exterior, install THERMAX
™
(ci)
Exterior Insulation horizontally
with the shiplap edge up (for
boards that contact the steel studs).
2. Use maximum board lengths to
minimize number of joints. Locate
edge joints parallel to and on
framing flange. Center end joints
over supports and stagger in each
course.
3. Anchor to exterior face of exterior
metal stud wall framing with
appropriate fastener. Abut
insulation boards tightly together
around openings and penetrations.
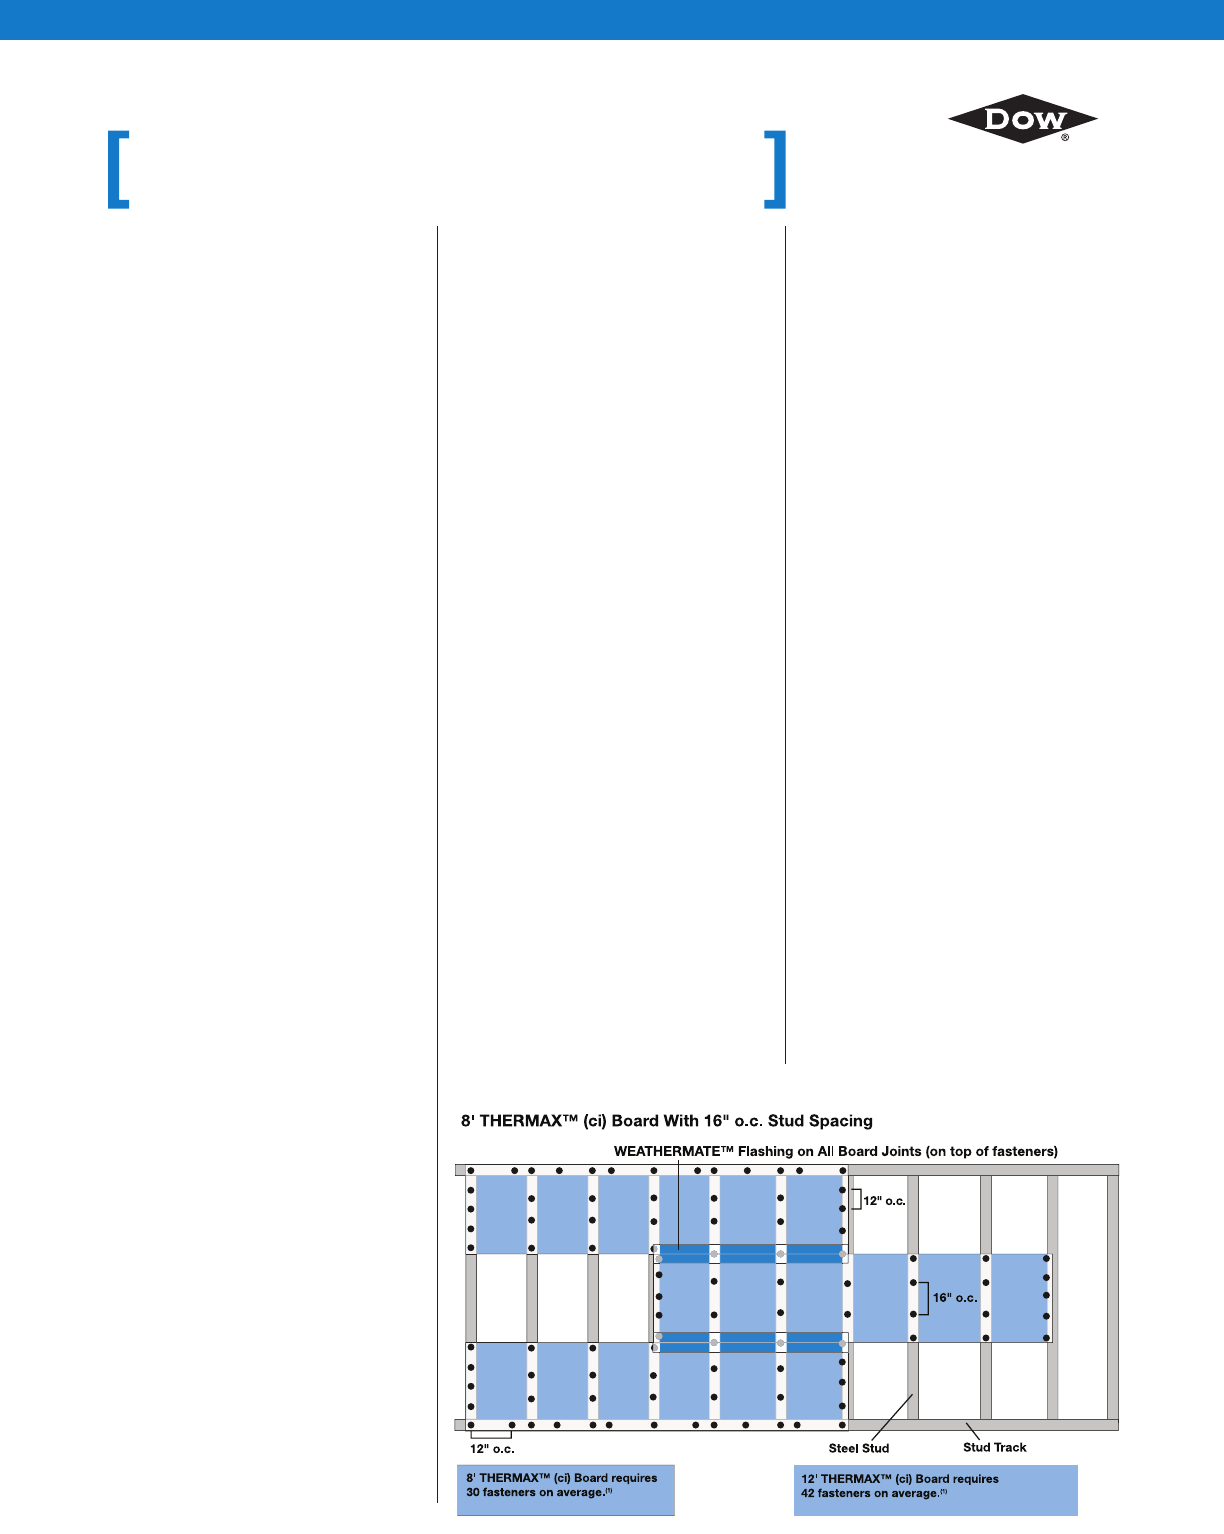
4. Fasten boards of THERMAX
™
(ci)
Exterior Insulation to each
support with fasteners spaced
12" o.c. at perimeter and 16" o.c.
in the field. Dow has specified the
Wind-Lock ci-LOCK fastener/
washer because it was used for
the ASTM E330 wind load testing.
Other fasteners designed
specifically for rigid foam
sheathing may be used, including
t
hose listed on page 19 of Tech
Solutions 513.0: THERMAX
™
Wall
System, which is available at
www.thermaxwallsystem.com.
See Figure 1 for recommended
fastening pattern. Set back
perimeter fasteners 3/8" from
board edges and ends. One
approved fastener/washer can be
placed to bridge a maximum of
two board edges. Drive fasteners
to bear washer tight and flush
with surface of insulated
sheathing. Do not countersink.
5. For optimum performance and to
create a water-resistive barrier,
seal all end and edge joints, and
thru-wall penetrations, such as
window and door openings, with
WEATHERMATE
™
Flashing.
6. It is critical that flashing be
attached in shingle fashion on the
face of THERMAX
™
(ci) Exterior
Insulation and that all thru-wall
penetrations are properly flashed
to achieve a continuous drainage
plane. A minimum overlap the
width of the flashing is
recommended. For example, if
using 4" wide WEATHERMATE
™
Flashing, overlap by at least 4".
7. THERMAX
™
(ci) Exterior Insulation
boards should be properly repaired
if damaged during installation.
Repairs may include applying a
strip of flashing over a small hole
or filling a large hole with a piece
Installation Procedures for
THERMAX
™
Wall System
SEQUENCING OVERVIEW
I
nstallation of the THERMAX
™
W
all
System can begin once the structural
steel and exterior wall steel studs
have been installed and braced.
By using the all-steel bracing design,
a drywall or masonry contractor can
begin immediately installing boards
of THERMAX
™
(ci) Exterior Insulation
on the exterior of the building envelope.
(Insulation can be left exposed for
180 days.) As the contractor applies
succeeding boards, WEATHERMATE
™
Flashing is adhered to adjoining
board joints and at pre-determined
thru-wall penetrations. Windows and
other openings are flashed following
the removal of excess THERMAX
™
(ci)
Exterior Insulation in these areas of
the envelope.
With the building closed in, the
structure has an insulated and
weatherized envelope, which will
allow for work to progress quickly
on the interior of the structure. By
completing this step, a building can
begin to be conditioned, which can
speed up the work of other trades
beyond the exterior walls.
Once sections of insulation boards
and flashing are in place, a contractor
can follow this work and adhere a strip
of flashing to the face of the insulation
(where the tie will be inserted). Veneer
ties used to anchor the final exterior
of the building can then be mounted.
When the necessary ties are in place,
masonry work or installation of other
veneers can begin on these areas of
the building.
After the ties are secured to the
steel studs on the interior, it is
important to ensure that, if necessary,
a floor line fire-stop is installed in
the stud cavity. STYROFOAM™
brand Spray Polyurethane Foam
Insulation (CM Series) can now be
applied in the stud cavity, covering
the fire-stop (if installed) back to the
floor edge to complete the air barrier,
to further seal and insulate the
envelope. STYROFOAM™ brand
Spray Polyurethane Foam
Insulation (CM Series) should be
applied after the chosen veneer ties
are in place. This allows free access
for proper attachment of the tie.
However, once the ties are in place,
bricks can be laid on the exterior
while a STYROFOAM™ brand
Spray Polyurethane Foam Insulation
Figure 1: Fastening Pattern for THERMAX
™
(ci) Exterior Insulation
(1) Average number stated may be less when washers are used to bridge adjoining boards or more when a true fastening perimeter outlines all four edges of the board.

 (2 pages)
 (4 pages)
 Manymanuals.com
 Manymanuals.de
 Manymanuals.fr
 Manymanuals.it
 Manymanuals.pl
 Manymanuals.cz
 Manymanuals.es
 Manymanuals-pt.com
Comments to this Manuals